The Journey to Find Cost Efficient Aluminium Rapid Parts Continued - Part Six
So I got into the office early
this morning, to find an urgent job that needed an aluminium part!
We did the CAD quickly, sent it to
our Uprint 3D printer and I have just arrived back from the foundry with 5
castings! To some it might not sound like much, but for us, managing to
go from concept to aluminium parts in less than 12 hours is fantastic.
Here is a screen shot of the part in Solidworks.
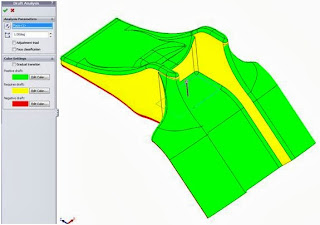
So after doing the initial CAD I used the Solidworks tools to check the draft angles to make sure the foundry would be OK casting the part without having to rework any of the plastic master.
Here is a screen shot mid way through checking.
Using the scaling tool, I added 3%
to its size and then saved it as an STL ready for the printer.
The UPrint 3D printer took 2 hours
to print the part, and I jumped in the car and dropped it off at the foundry.
Mid afternoon I got a call to say
they were ready for collection.
For those of you out there use to
working with castings, it will look quite good. Those of you not so used
to seeing a raw casting it looks very rough around the edges. Because it
was such a quick job the foundry have not trimmed off the flashing (thin parts
of aluminium that seeps into the split line of the sand mould).
So I will be spending the rest of Friday afternoon filing back the flashing. First thing Monday morning the
parts can be heat treated so they can be a fully structural part.
Its quite an exciting process, and
its great to know it can be done...


No comments:
Post a Comment
Note: only a member of this blog may post a comment.